The Ultimate Idiot Guide! For Idiots by Idiots!Answers,Questions,Tips + Tricks: RTFM!

Status
Not open for further replies.

gameboy

Ding Dang Doo
Joined
Jan 31, 2004
Messages
4,305
Reaction score
6
Points
38
Age
67
Website
www.gamezplay.org
My Satellite Setup
DreamBox 7000s - Nokia Freeview - Several GameBoys - DS Lite - ZX81 - SNES - N64 - Saturn - Dreamcast - PlayStation - PS2 - Gamecube - PSP - iPod - iPhone - XBox - PS3 - Wii - iPad - No Life!
My Location
Scotland
How to change the Boot Loader image...

=================
=== EasyLogo v1.0 ====
==== by MusicBob ====
=================

What is EasyLogo?

EasyLogo is a dreambox plugin that allows to extract and save, or also to change, the boot-logo picture of the currently loaded flash image.
It is NOT requested to unpack and then repack the image, but all is done just by pressing a button on the remote control, in a few seconds.
The new boot-logo will be immediately visible on the next restart.

Installing

Just copy, via FTP, the files "easylogo.so" and "easylogo.cfg" to /var/tuxbox/plugins

Using

EasyLogo has double function, selectable from the plugin's main window:

- "Grab logo from flash image"
allows to extract the boot-logo picture from the flash image, and saves it into /tmp directory, with the filename of "bildgrab".

- "Change logo of flash image"
allows to change the boot-logo picture of the flash image, taking the new one from the file "/tmp/newbild", that the user will FTP to the box before starting the procedure.

So, step-by-step:

A) "Grab logo from flash image"

1) once entered the plugin, just press BLUE key on the remote control to activate this function.

2) the procedure will end in one second (a "Done" window will appear), and you will find the grabbed boot-logo into "/tmp/bildgrab"

:cool: "Change logo of flash image"

1) Prepare your favourite picture for your boot-logo, by using TMPGenc and by following the usual procedure described everywhere on almost all the available dreambox's FAQ.
To make easy the setup of TMPenc, I included a template "TMPEnc_template.mcf" prepared for standard boot-logo mpeg conversion. You will find it into the directory "template" in the EasyLogo zip archive.
Just drag&drop the template file on the main window of TMPGenc and you'll be ready to convert.

2) once converted your picture with TMPGenc, rename the output file to "newbild"
(into the "demo" directory of the archive, you'll find a "newbild" file, ready to use, with a nice boot-logo picture, that will be surely appreciated by all the linux-maniacs... :-D )

3) ccopy "newbild" file to /tmp (with a FTP proggy)

4) Start the plugin, and push the RED button of the remote control to begin the procedure.
A progress meter will appear on a pop-up window to display the status of the install.

5) All will be finished within 10-15 seconds :-)

6) Exit from the plugin and reboot dreambox... nice boot logo, isn't it? :-))


Click here for Index
 

costasd3

Dreambox Emu Tamer
Joined
Nov 17, 2004
Messages
52
Reaction score
0
Points
0
Age
47
1. You need to obtain the cam program files and keys.

2. If you are upgrading switch to an FTA channel and choose common interface from the emu list (usually blue button) to stop any cam that is running.

3. Transfer the program files and keys to the appropriate directories of your dreambox and make sure that the program files (the files that go to var/bin) have the right access permissions (usually 755). You can find the correct location of the files from a previous post in this guide by T_G (“Gameboy's Lesson # 80: "Where to stick it" or simply: "Ding-dang-doo!”)

5. Now you have to make the cam available from the emu list if you are doing a manual installation. This is different in almost every team image release that I tried so I will only explain the procedure for the most popular images.


The Hydra Images


The only thing you have to do is to edit the smartcam.config file that is located at var/etc and add the following (whatever is in red) before “# End of SoftCam List” to the file save it and put it back in place.


For SCAM


osd-name n= SCAM
emulator n= SCAM 2.5d
camd n=
daemon n= scam2
kill n=
sleep n=
zap-sleep n= 4


For CAMX


osd-name n= CAMX
emulator n= CamX [v.30.03.05]
camd n=
daemon n= camx
kill n=
sleep n=
zap-sleep n= 5


For MGCamd


osd-name n= MGCAMD
emulator n= mgcamd [v1.20b]
camd n=
daemon n= cardserver.dream;mgcamd
kill n=
sleep n= 3
zap-sleep n= 5


For Camd3


osd-name n= CAMD3
emulator n= CAMD3
camd n=
daemon n= camd3
kill n=
sleep n=
zap-sleep n= 3


The n on every line represents a number the same for every line of the same cam but different from any other cam.

On line 2 (emulator n=) is the name that appears on the emulist so you can name it whatever you want.

On line 4 is the names of the program files separated with ; if more than one. I believe that you can use different versions of the same cams if you just rename the program files and put the appropriate entry on this line.


The SDT Images


For every cam create a file with WordPad or any other text editor that you like and name it whatever you want with the extension of emu. For example for camd3 name the file camd3.emu so that you know which file is for what emu.


In the file put the following. The last line after ### is an empty line but I do not know if it makes any difference.


For camd3

Camd 3.712
pcamd
camd3
###


For CamX

CamX 30/03/05
serverng
camxng
###


For MGCamd

Mgcamd 0120b NDS
cardserv
sleep 2
mgcamd
###


For Newcamd

Newcamd 5.28+Betad
cardserv
betad
sleep 2
newcamd
###


For Radegast


Radegast 3.0 beta14
camd.rdgd
sleep 2
rdgd
sleep 1
netpilot
###


For SCAM

Scam 2.5d
scam
###


Line one is the name in emulist


CLICK HERE FOR INDEX
 

chuckles

Regular Member
Joined
Jan 1, 2000
Messages
146
Reaction score
0
Points
0
As requested, I thought it might be useful to post the following, at the risk of repeating everything or "teaching Granny to suck eggs"!
:eek:
S*y cards and Newcamd


You need cardserver0961 and cardserv.cfg files.
The 0961 file needs to be ftp'd into the var/bin/ directory to replace the cardserver file there. It needs also to be renamed to cardserver, cardserve or cardserver.??? depending on the image you are using. (Gemeni is cardserver) Change mod to 755.
Carserv.cfg needs to go in to var/tuxbox/config/.

Then edit the cardserv.cfg file with Ultraedit and insert the seriel no. from you digibox in the line BOXID=0000000000.
serial no. is as is on your system menus ie not hex.

Some folk report success with notepad to edit cardserv.cfg first, then ftp to DB, but that did not work for me.
I suggest a reboot then hopefully you're away.

The edited section of cardserv.cfg should read something like this. :)

SERIAL_PORT = 0
TCP_PORT = 10000
BOXID = xxxxxxxxxxxx
EMM-G = yes
EMM-S = yes
EMM-U = yes
SPECIAL_FEATURES = no
DISABLE_PIN = yes

If the approx. layout is already similar to above just insert the digibox no. and remove any hash signs at the beginning of any of the above lines.

If I've missed out anything let me know.
;)

EDIT added April 2008. An easier option if you wish to use a sky card with a Dreambox is to use CCcam. It usually works without the need to edit any configuration files (which is etc/CCcam.cfg if you were wondering).

Click here for Index
 

BGonaSTICK

Retired Moderator
Joined
Dec 22, 2003
Messages
5,145
Reaction score
0
Points
36
Age
50
My Satellite Setup
Dreambox 7000, Skystar2
My Location
Brighton
Thanks to PCD fror this tasty contribution... :D

Being a poor 5620 owner, I use the following method for recording on pc and playback (found to be better than other methods like mtuxvision and mgrab). I tried it with Gemini1.04. :-

In PC

(1) Create another user dream with username and passwd both dream.
(2) Create shared directory c:\dreambox\movie
(3) Download and install VLC player. Link .mpg and .ts files to VLC player.

In DB

(4) Download plugin CIFS. (included in Gemini 3.1)
(5) In expert settings-comm-blue button-select the following (See Attachment 'CIFS Howto' for more help).

PC ip
CIFS
Dir-dreambox
local dir -hdd (if that doesn't work try /mnt/hdd)
dream
dream
RW
tick "automount"
leave the rest
Mount.

To record

(6) Video button followed by Radio button. To stop recording, press TV button. To see timer menu press Radio button again.

To watch on TV

(7) Dream-File mode-root-hdd-movie - select file OK.

Hope it works for you. Regards, pcd.


Addition by TG: I just found out that if you place an MPEG or an MP3 in the directory on the PC you can see it or listen to it through the Dreambox. I had a few old recordings that I dome on the PC based receiver, they viewed just fine on the Draeambox!! :) . I have moved all my music and mpeg to the mounted directory, now I can listen to everything on the DB!

Click here for Index
 

PCD

DB Magician
Joined
Jul 19, 2003
Messages
632
Reaction score
1
Points
18
Plugins can be mounted on the PC using NFS, thereby saving scarce var space, particularly in the smaller Dreamboxes. This can be done with the following simple steps. These steps are to be carried out in strict sequence. I have been using this method with a DM5620 and with Windows XP Home in the pc.

(A) SET UP NFS (This and section (:cool: were originally described in the dreambox.net.au site which has now closed. I have modified for use with Gemini1.04 )

1. Download and unzip the attached TrueGridNFS server tgpnfs10.zip (Freeware)

2. Create an etc directory on your pc such as :-

C:\WINDOWS\etc

3. Create a share directory on your pc for the nfs share (This can be the same folder as for CIFS mount as described in the Idiots Guide. The simplest way to create a share folder is to rightclick on the folder - properties - sharing - select 'share this folder in the network') such as :-

C:\dreambox

Also create the following sub directory:-

C:\dreambox\Plugins

4. Create a directory and extract NFS server (tgpnfs.zip) files on your
pc. Eg:-

C:\TrueGridNFS

5. Copy the two files from this folder, rpc and exports, to the etc directory that you created in step 2.

6. Edit the exports file. Add a line at the end of the file to point to the nfs directory you created in step 3. The line should look like this:

/dreambox -path=c:\dreambox

7. Make sure the last line of the exports file is a blank line. Save the file.

8. With internet connected, open a command line prompt (start-Run-cmd or command-ok) and write the command (note that each command must be followed by return) :-

cd c:\TrueGridNFS

9. Write the following two commands to register and setup the portmap and nfs services:

portmap add
nfs add

10. Write the following commands to start the services :-

nfs stop
nfs start

11. a. To show what is available to share, write the command:-

Showmount -e

The response should be :

TrueGrid SHOWMOUNT UTILITY.

COPYRIGHT (C) BY XYZ SCIENTIFIC APPLICATIONS, INC., 1998
ALL RIGHTS RESERVED. TrueGrid IS A TRADEMARK OF
XYZ SCIENTIFIC APPLICATIONS, INC.

/dreambox (everyone)

b. To show port mapping, write the command:

rpcinfo -p

The response should be:

COPYRIGHT BY XYZ SCIENTIFIC APPLICATIONS, INC., 1998
ALL RIGHTS RESERVED. TrueGrid IS A TRADEMARK OF
XYZ SCIENTIFIC APPLICATIONS, INC.

program vers proto port
100000 2 tcp 111 portmapper
100000 2 udp 111 portmapper
100005 1 udp 714 mountd
100005 1 tcp 717 mountd
100003 2 udp 2049 nfs

The internet can now be disconnected.


(:cool:MOUNT NFS

1. On the dreambox navigate to communications setup.

Setup>Expert Setup>Communications Setup>Mount Setup

2. Enter your mount info:

IP: 192.168.0.1 ......................: your pc ip
NFS
Dir: dreambox .......................: your nfs share directory
LocalDir: /hdd ........................: your db directory
Options: rw
Extra: nolock,rsize=8192,wsize=8192

3. If you put an X in the Automount box the mount will be automatically
re-established at each bootup.

4. Select Mount (green).

5. If the mount is successful SAVE the mount settings.


(C) MOUNT PLUGINS

1. Ftp the contents of the plugins directory in the Dreambox

/var/tuxbox/plugins/

to the new mounted plugins directory in the PC created in step A3

dreambox/plugins

2. Verify the contents have copied correctly

3. Delete the old plugins diectory in the Dreambox folder /var/tuxbox/

4. Start a telnet session. To start telnet, open the command window as before and write the command :-

telnet 192.168.0.24 (DB ip)

5. Write when prompted :-

Username=root
Password=dreambox

At command prompt write the following commands to reate a symlink to the new plugins directory: (press enter after each line)

cd /var/tuxbox
ln -sf /hdd/plugins

when finished type: exit (enter)

***********************
Added by TG for those who want to go further with the space saving exercise:

Any var folder can be moved to the mounted directory if each time the simple steps as described by PCD are followed.
If there is for instance the weather plugin (mucho importante!!) you want to move as well, which sits in the var/tuxbox/config, all you have to do is copy the weather file into the dreambox folder, delete it and telnet:

cd /var/tuxbox/config
ln -sf /hdd/weather

exit

****************************

6. Test a plugin from the Dreambox as well as check in the PC share
that newly downloaded plugins appear there.

ps. Please note that this plugins mount and 'nfs multiboot' will not work together. You need to unmount the plugins from hdd in order to connect by flashwizard nfs multiboot. To unmount plugins first do 'unmount nfs' at the db, next at the pc delete the symlink you will see in /var/tuxbox by ftp, then create (by rightclicking on any item in /var/tuxbox) a new folder (path) named plugins. You can also copy some plugins to this folder from your share folder 'plugins' if you want to use them without nfs.

Good luck ! :)

Regards, pcd.


Click here for Index
 

DCG

Regular Member
Joined
May 21, 2004
Messages
117
Reaction score
2
Points
18
Age
57
My Satellite Setup
dm 7000 and 7020
cas 3
blue ice cam
sv card
redlight card
seca cam
reality cam
opos 1.03 and 1.05
lynksys router
gold cards
fun cards
1.1 mtr trix dish
0.3 sharp lnb
hh100 moter
xplus tv and inxtc card
s_x view +
ceribro card
My Location
just above the earth
working with dream box (original list)


AcerUSB 2.0 Flash Stick1.1 - 2.0128 - 1 GB128/256JA
AiptekPendisk1.132 - 25632JAja
AiptekPendisk 22.0128 - 256256JAja
ApacerHandy Steno1.1 - 2.032 - 1 GB64/256JAjaBC
CAPTIVA(Seitec) USB BAR1.1 - 2.016 - 1 GB128/256JA
ConradSpeedDrive2.064 - 512128JAD
DTKMemory Stick128 - 1 GB128JAE
EasyDiskUSB Flash Memory Disk 1.0 - 1.116 - 51264JAja
EasyDiskUSB Flash Memory Disk1.0 - 2.064 - 256128NEINja
DARMarchi Disk1.1128128JA
ExtreMeMoryUSB Drive1.1 - 2.064 - 256128JAjaF
FreecomFM-10 Pro2.032 - 512256JA
Fujitsu-SiemensMemorybird (Der Kleine!)1.116 - 256128JAG
GericomMemory Key1.1 - 2.0128 - 256128JAjaH
VosonicHyperDrive1.1 - 2.032 - 1 GB128JAjaI
InnoVISIONEIO Pen Drive2.032 - 1 GB128JA
IOMEGAMini Drive1.1 - 2.064 - 25664JAjaJ
TranscendJetFlash1.1 - 2.032 - 4 GB128JAjaK
KingmaxUSB 1.1 Flash Drive1.132 - 51264JAja
KingmaxUSB 2.0 Flash Drive2.032 - 512128/256NEINja
KingstonDataTraveler1.132 - 256128JA
KingstonCF + USB2 reader (CF/256ADP)2.032 - 1 GB256JAL
LeadingDriverLD- UD111.132 - 512128/256JA
MMedionUSB Memory Drive1.112864/128JAN128J
AArowanaUSB Memory Drive (Norma Label = "W@lk Key")1.164 - 128128JAja
NTPNTP Mobile Drive 3in1 (SD+MMC)1.132 - 1 GB128JAja
OPPendrivePen Drive Plus2.016 - 2 GB256NEIN
Peak 256mb ja
Pitstore24OEM1.1 - 2.0128 - 256128JA(ja)
PNYAttache' USB 2.0 Flash Drives1.1 - 2.0128 - 512128JA
QQDIUSB Disk (Genauere Daten unbekannt)1.1 - 2.064 - 1 GB64/128NEIN
Q-MAX(Genauere Daten unbekannt)1.1128JA
RSSANDISKCruzer Mini1.1 - 2.0128 bis 256128JA
Seitec(Captiva) USB BAR1.1 - 2.032 bis 512128NEIN
SharkoonSharkoon (Schwarze Schrift)1.132 - 512128JA
SharkoonSharkoon (Blaue Schrift)2.0128 - 2 GB128/256NEIN
SonySony MicroVault (USM128S/USM256U20 2.032 - 256128/256JA
TTinyTiny Disk1.1128JA
TinyTiny Disk2.0256JA
TraxdataEZ Drive 1.132 - 256128JA
TREKSTORUSB Ministick1.1 - 2.064 - 256256JAja
TwinmosMobile Disk III1.132 - 25664/128/256JA
TYPHOONUSB Memory Adapter1.132 - 12832/128JA
TYPHOONUSB 2.0 MEMORY ADAPTER2.032 - 256128NEIN
UVEasyDiskUSB Flash Memory Disk1.0 - 2.064 - 256128NEINja
FGHIJKKingmaxUSB 2.0 Flash Drive2.032 - 512128/256NEINja
LMNOPendrivePen Drive Plus2.016 - 2 GB256NEIN
PQQDIUSB Disk (Genauere Daten unbekannt)1.1 - 2.064 - 1 GB64/128NEIN
RSSeitec(Captiva) USB BAR1.1 - 2.032 bis 512128NEIN
SharkoonSharkoon (Blaue Schrift)2.0128 - 2 GB128/256NEIN
TTYPHOONUSB 2.0 MEMORY ADAPTER2.032 - 256128NEIN
UVWXSitecomSitecom CF-Card-Reader mit Xtra Green CF 1.1256NEIN

Updated list:

This is a list from 2006 of ones that are reported to work and of others that are problematic. Don't take it completely as gospel though as i have seen reports of some on the not working list working fine in a 7020.

This was list was taken from the old Satellitehelp forum and was first listed by member Jimdefruit.

KNOWN TO BE WORKING

Acer USB 2.o 256 mb
Aiptek USB Flash Disk 256M-F (USB 2.0)
Apacer Handy Drive 2.0 USB 2.0 256MB
Bar 2.0 256 mb
BAR USB 2.0 128 MB
CAPTIVA USB 1.1 BAR 128 MB
Dell Stick USB 1.1 64MB
DTK 2 USB Sticks mit 128 MB
EasyDisk USB-Stick - 64 MB
EasyDisk, 1.1 64MB von
EIO USB 1.1 128 MB
Extreme memory 128MB USB 1.1
Fa. Reichelt USB 2.0 128 MB
Flash Drive
Freecom USB 2.0, 256MB
Fujitsu-Siemens Memorybird 128 MB USB 1.1
Gericom, Pocketable USB Flash Drive 128MB
HyperDrive 2.0/128 MB
Intelligent Lik Sang 1.1/2.0 128mb
IOMEGA Mini Drive 64 MB
JetFlash 128 mb
Kingmax 64 MB USB 1.1
Kingston 128 MB USB 1.1
LD Leading Driver 128 MB
Marchi Disk 128 MB
Medion 128MB USB1.1
Medion USB 2.0 256 MB
Memory Drive Apacher 64 MB USB 1.1
Mobile Disk III 1.1 128 MB
Norma USB1.1 128 MB
NTP Mobile Drive 3in1 SD+MMC 128 MB
Pine USB 2.0 128MB
Pine USB 2.0 256MB
Pine USB 2.0 512MB
Pitstore24 OEM 128 MB
Q-Max 128 MB USB 1.1
Sandisk "Cruzer" USB 1.1, 128MB
Sandisk "Cruzer" USB 2.0 128MB
SanDisk Cruzer Mini Hi-Speed USB 2.0 256MB
Sharkoon 1.1 128 mb
Sharkoon 2.0 128 mb 2x
Sharkoon Flexi Drive USB 2.0 256 MB
Sony Micro Vault USB 2.0 128MB
Sunsun USB 1.1 128mb
Targa visionary
TEAC UF-507TSM USB 2.0 128 MB
Tiny USB 2.0 128MB
Tiny USB 2.0 256MB
Tiny USB 2.0 512MB
Transcend JetFlash 128MB / 256MB
Traxdata EZ-ID1 USB Stick 128MB - 1.1
Trekstor 256mb, usb 1.1 Ministick
Twin Mos Mobile Disc III 128MB
Twin Mos Mobile Disk III Stick 64MB
Twin MOS Mobile Disk USB 1.1 256 MB
Twin MOS Mobile Disk USB 2.0 256 MB
Tyhoon usb memory adapter
USBBAR 1.1 128 MB
Verbatim USB 2.0 128 MB
Yakumo USB 2.0 64 MB
Dane-Elec zMate Pen USB 2.0 256 MB

Added Oct 2007 :-

Kingston Data Traveller 256mb
Kingston Data Traveller 512mb

PROBLEM / NON WORKING

EasyDisk 1.1 128MB
Kingmax 256 MB USB 2.0
Kingmax USB 2.0 128mb
Minimax USB 2.0 256 MB
Pen Drive Plus 2.0 256MB
QDI 1.1 64 MB
QDI Stick 64 MB
QDI USB - Stick 128mb
QDI USB-Disk 128 MB USB1.1
Q-Max 1.1 64 MB
Sharkoon 128 mb USB 2.0
Sony MicroVault 128/256 MByte
Yakumo 128 MB USB 2.0

Added October 2007:-
Traxdata 256mb

Added March 2008:-

Cruzer Micro 2.0gb - OK
Emtec usb 8gb - not compatbible


Click here for Index
 

DCG

Regular Member
Joined
May 21, 2004
Messages
117
Reaction score
2
Points
18
Age
57
My Satellite Setup
dm 7000 and 7020
cas 3
blue ice cam
sv card
redlight card
seca cam
reality cam
opos 1.03 and 1.05
lynksys router
gold cards
fun cards
1.1 mtr trix dish
0.3 sharp lnb
hh100 moter
xplus tv and inxtc card
s_x view +
ceribro card
My Location
just above the earth
posted by icum

a lot of people are having this problem with the db7020, i have copyed this from dreams forum so it might help you, i know i have and 2 7020 boxs out of 10 have had this problem for me and i tryed every thing and still dont work ........
------------------------------------------------------------
Hello my dreambox shows some network activity a few seconds after power on, then the activity light on the router goes off. So it seems the Ethernet interface in the 7020 turns off. Everything have worked perfectly before.

If I boot up to the boot menu without the Ethernet cable plugged in then when I insert the cable the network is there.
I can connect to the web interface but as soon as I try to do something useful such as transferring an image the network goes away !

I have tried static settings and DHCP, no difference.
Everything was Ok before.

So I better return it to the dealer for repair.

Do you have any idea what can be wrong ?

Everything have worked perfectly for a couple of weeks untiil this occurred.

Regards,

Dieser Beitrag wurde 2 mal editiert, zum letzten Mal von nova-t am 12.06.2005 03:32.
-----------------------------------------------------------

Well, same thing happened to me and to lot of other guys. The less serious version of this problem is that the ethernet connection is stable, but very very slow. I experimented with several different ethernet switches an in one case it was exactly as you described (more serious case).

I happened to "solve" the problem with an older ethernet switch which somehow is "compatible" to the 7020 network chip. See: ****://www.dream-multimedia-tv.de/board/...adid=11643&sid= - unfortunately in German only)

The people at Dream are aware of the problem and try to solve it by adapting the driver software. They are working on it at least since march. And: in one of the german threads concerning the problem they said that it still may take some time ...

------------------------------------------------------------

Hello I was somehow able to solve the problem. I don't think it was related to the problem in the above comment. Before that I tried just about eveything including totally erasing everything and installing the default image over Dreamup using serial cable alone. It was traumatic. I was pleased to learn the bootstrap is on ROM on the 7020 and survives most anything.
When I connected the 7020 to a PC over a direct crossover Ethernet cable I was able to reliably communicate with the DB again over Ethernet. I reinstalled all my stuff that way and when I plugged the DB back into the router this time it didn't shy away but continued to stay up. I got my channels back and tried CIFS streaming and all OK again. But this consumed most of my weekend. unglücklich I was already envisioning having to return the DB for repair and having to purchase yet another DB to have in the meantime (addiction would have demanded it) Augenzwinkern but it seems I am ok now.

Update June 14:

I have the 7020 up and running again but am still not certain about the reason for my problem. I used DreamUp now to flash a new original image (last inofficial) using null modem cable. I booted it up and this time it got assigned an IP by the router over DHCP. This time I have been careful not to set any IP addresses myself statically at any time but use DHCP. And it seems to work.

Regarding the problem people are solving with a combination of separate switch and router; I use a very low cost almost-obsolete-by-now Netgear wireless lan/switch+router (MR814) (802.11b) and to my understanding it has the switch built in. At least I haven't had problems with speed and streaming have worked without disturbances over the 100 Mbit/s ports of this router. I just keep fingers crossed the ethernet port of the 7020 will stay up now.

Dieser Beitrag wurde 3 mal editiert, zum letzten Mal von nova-t am

Click here for Index
 

T_G

The Consumate Dreamer
Staff member
Joined
Jan 1, 2000
Messages
6,693
Reaction score
241
Points
63
Age
58
My Satellite Setup
1 GigaBlue Quad plus, 1 Dreambox 5620, MOTECK SG2100A DISEqC Motor, 120 cm noname offset dish, Humax 95 cm offset dish and a few UK digiboxes.
My Location
Somewhere where the Sauer is Kraut and the Wurst is Brat
In order to find the stuff in the Idiot Guide I have made it Idiot easy :-beer to find stuff. Simply place your mouse pointer over the link and then naaaah I reckon this is easy enough :-bunny

Just bought a Dreambox? Stop! Read the Doom and Klona guides in the Links Page below before reading any further.

[fieldset= READ THESE FIRST]
Idiot Guide Rules and Regulations
Ignore this page and :-bash

Idiot Guide MkII Dream Links Page
Links to other relevant information

[/fieldset]

Just bought a Dreambox? Stop! Did you read the Doom and Klona guides in the Links Page above?.


How to install a motor/ dish
satellite-newbie.co.uk

Lesson #3: DreamUp flash utility
Null modem cable anybody? :D


Lesson number 192.168.0.5 or How to Network

Communication Setup

FTP - a beginners guide

Lesson #13: How to Backup Your Channel Lists

Happy Llamas are useful you know


Key Updating Utility Possibly not as relevant at this moment, but...

DreamUpLan Utility for flashing images
For those who want to load up images with network cable and not use the Flashwizard


Lesson # 5.7 How to flip channels with your browser and other meaningful stuff

Lesson # 52 sub section 3: How to record from Dreambox-Computer using LAN connection

Not state of the art, but a good read anyway


Screenshots of a working Dreambox Image

Stripped & Naked, all bits visible

Updating keys or plugins by FTP
How to FTP keys and plugins to your Dreambox


Dreambox and Motors
Some info about motorised systems


Idiot Lesson 13/B: Settings, stations, frequencies, transponder updates

If you have not seen the first post about the rules, try this

Grounding the Dreambox
Some think that this solves flashing errors

Lesson Nr. Conaxed 21 or "How to do it on your own"
Not much use for at this moment but a nice write up


Lesson 68 "NewcamD manual upgrade to V5.25"

Gameboy Lesson # 80: "Where to stick it"
Information about where to put keys for what cam - May need updating for new cam versions


Hey, T_G, you are famous!
Yep, "they" know we know

How to change the Boot Loader image...

How to manually install/upgrade cams on dreambox

Newcamd and Sky UK cards - how to
How to watch those 28 east channels on the Dreambox


How to record to a computer HHD
How to mount an external hard drive - useful if you have a 500 or 5620

How to mount a NAS

How to Transfer Plugins to PC using NFS
Var too full? Read for solution!


Compatible usb sticks
A very long list of USB sticks and links to manufacturers


Ethernet problems Deals with the specific problem of the 7020 Dreambox model

How to Image the 7020

How to flash DM7020s with compact flash

How to change password

How to edit keys/files/attributes etc using the plugin Tuxbox Commander

Quick and dirty guide to dreambox
Dreamboxmeister DCG put together a lot of the basics in one write up.

How to change the boot and radio background picures.
If you want to pimp your Dreambox, Lovelyperson gives you the tools

How to add a record button to a DM500s remote
There is no "record" button on a DB500s remote control so...

How to stream from Winamp to Dreambox

How to take your remote apart (and sort of put it back together)

How to set up Port Forwarding on your router

How to use SBCL/ vplug (TPS)

How to check and read e-mails on your dreambox using the Tuxmail plugin by HB13Dish

How to use a keyboard with a DreamBox by HB13Dish

How to access subservices e.g. Premiers Sport and use EPG

How to take a screenshot
We really like it when you include screenshots with your questions.

How to manually install a plugin or cam

How to find a lost PIN
Use Tux Commander to find your PIN

How to remotely control your Dreambox

FTP your Dreambox or set up a recording while away from home

How to manually find and store satellite positions

The DM500s doesn't support gotoXX - this method might be useful

Cards that do and do not work with CCcam

A list of subscription cards that do and don't work with CCcam

How to add a download servers to (Gemini) images
If you are fed up with manual insattlation of stuff and want to keep using the blue button then do what it says in these instructions, will ya?
 

DCG

Regular Member
Joined
May 21, 2004
Messages
117
Reaction score
2
Points
18
Age
57
My Satellite Setup
dm 7000 and 7020
cas 3
blue ice cam
sv card
redlight card
seca cam
reality cam
opos 1.03 and 1.05
lynksys router
gold cards
fun cards
1.1 mtr trix dish
0.3 sharp lnb
hh100 moter
xplus tv and inxtc card
s_x view +
ceribro card
My Location
just above the earth
posted by kevo on the den

How to flash DM7020s with compact flash

How to flash with cf card.

Unzip all.......

1. copy autorun file to a formatted cf
2. copy flash.elf file to cf
3. copy *.nfi file to cf and rename it "flash.nfi"

turn power off at rear of stb and insert cf in slot.
turn power on and when prompted to "flash now?" select "yes"
when done, power off again at rear, remove cf and power up/boot

Setup as new and have fun
biggrin.gif


Regards KEV0
rightonman.gif


cheers kev


Click here for Index
 

DCG

Regular Member
Joined
May 21, 2004
Messages
117
Reaction score
2
Points
18
Age
57
My Satellite Setup
dm 7000 and 7020
cas 3
blue ice cam
sv card
redlight card
seca cam
reality cam
opos 1.03 and 1.05
lynksys router
gold cards
fun cards
1.1 mtr trix dish
0.3 sharp lnb
hh100 moter
xplus tv and inxtc card
s_x view +
ceribro card
My Location
just above the earth
strongly recommended for cs


press start menu ,then run ,in the space type cmd
then in the promt type telnet (dreambox ip ) without the brackets
enter the user as root
then password dreambox
then type passwd
then enter the password you want twice and you are done


Click here for Index
 

lovelyperson

Dreamer
Joined
Sep 8, 2004
Messages
1,017
Reaction score
1,819
Points
113
Location
Alicante, España
My Satellite Setup
2.0m PF dish
1.8m PF Famaval
1.8m PF Marrafa
1.4m Tecatel offset
1.2m dish + Stab HH120
TBS 5925 USB
Octagon SF8008 4k Twin
GTMedia V8 UHD
GTMedia GTcombos x 2
Goldmaster SR525 HD
Sat-illimitè F300 hyper
62.0ºE - 63.0ºW
My Location
Alicante, España
T_G said:
the ultimate Idiot Guide!
:D Qualifying for this title I thought I would add to it!!

:confused How to edit (alter keys/files/attributes etc) in the Dreambox using the Plugin... 'TuxBox Commander'.

NO Internet connection needed when using 'TuxBox Commander'.

Example below using image: Gemini 2.6, but also fully works in other images... DaVinci, Hydra etc.

Obviously when you first use 'TuxBox Commander' you may be a little pensive, so to protect yourself, make a back up copy of the image with the program 'Flash Wizard' and, if anything goes amiss with your updating/playing with files etc, you can at least reload the back up image to the DB.

Suggest as always, that you use a USB memory stick for your working image as opposed to the HDD (always spinning), and leave the flash image untouched, ie: contains NO softcams and/or key files etc, that way basically you should encounter no problems.

Anyway, you probably have this plugin already in your running image: Gemini/DaVinci etc, with the yellow or blue button scroll down and select 'TuxBox Commander'.

Those who have an understanding of the FTP progs will recognise the basic on screen file structure.

************************************************** ***********************

Example of how to edit and update the daily Multivision ('tpscrypt') key change.

Firstly with 'newcamd'

We need to locate, as in FTP, the 'tpscrypt' file the path is... 'var/scce/tpscrypt'

The opening Tuxbox screen may differ depending on its last use, but, in this example to edit the 'tps' file, look for it on the left side and with the 'up' and 'down' buttons of the remote, highlight the file named 'var' and press 'ok'.(The opening screen may be different and you can already see the 'scce' file or even further advanced and can see the 'tpscrypt' file.)

If after 'var', from the new files displayed highlight the file 'scce' and press 'ok'.

Next screen, highlight the file 'tpscrypt' but DO NOT press 'ok' on the remote.

Referring to the options at the foot of the screen ('1-rights', '2-rename', '3-view' etc which are not highlightable),and after ensuring the 'tpscrypt' file is highlighted, press '4' on the remote control, this takes you into the '4-edit' mode.

Scroll down to the desired line you wish to edit, in this case the line beginning '007c00:01:etc'....highlight it and press 'ok'.

The line is NOW active and anything you touch on the remote will result in a change to the file, does not matter too much if you make an error as you have an option (see later) to deny the changes you have made. ****Good job as I have made many!!! :-ohmy

Using the 'right' button on the remote move along the line to where the amended keys are to start, in this instance after ' 007c00:01:', so that the red position indicator sits over the first key (letter/number) to be edited. This 'tps' key needs the 32 (16x2) keys replaced.

If you refer to the foot of the screen you will see what letters/numbers/symbols etc are represented by the number pressed on the remote control, ie: for an 'a'...press '2' on the remote control once.
for a 'b'...press '2' on the remote control twice.
for a 'c'...press '2' on the remote control three times.
for a '2'...press '2' on the remote control four times.

After you have entered a key value, the next entry YOU make will automatically be inserted to the right of the previous entry, ie: correct place and no need for you to move to the right using the remote. There is an exception, and it must be mentioned that, say for example, the keys 'bc' need to be entered, that after you have entered the 'b' and before you enter the 'c' you WILL have to move, using the remote 'right' button, one to the right, then enter the 'c'....this is because (look at the foot of the screen) that the 'b' and 'c' values are both obtained using the number '2' on the remote and if not moved manually to the right the 'b' input is overwritten with 'c'.

**clear as mud, never mind that is why I suggest an image back up prior to editing or until the prog is fully understood.

To sum up, to enter 'bc' :

a)press '2' on the remote twice = 'b'
b)press the 'right' button on the remote once (moves the red indicator one space to the right)
c)press '2' on the remote three times = 'c'

Follow this style thoughout the line remembering to put a space after every second input (obtained by using the 'right' on the remote). I find it easy to follow the old existing keys and position the 'red' indicator accordingly (ie: overwriting) .

When you have entered the 32 (16x2) keys press the 'ok' button and then visually check that you have made the correct editing required. If not, and you spot an error, simply ensure the offending line is highlighted and press the 'ok' button to re-enter the edit mode.

After all is checked press the red 'Exit' button and then select the 'yes' option on the nextscreen display. If you select 'No', NONE of your input will be saved, ie: you have done no damage/alterations and are free to start again!

View attachment 4805

Then again press 'Exit' and select 'yes'. This takes you back to the 'Plugins' selection screen.

Job done, restart your cam, in this instance 'newcamd' and you will, if all is ok, see your required Multivision channel.

If the channel/s do not appear to work there are rare times that you will/may have to set/change the rights/chmod to the amended file, as you do with FTP ie: 755 etc.

With TuxBox Commander open, highlight the file JUST edited, ie: 'tpscrypt', and, as shown at the bottom of the screen, press number '1' on the remote to enter the 'rights' mode. Here you can see the permissions, indicated by either a green or a red square, to change the value highlight the line in question and change the colour from red to green by pressing 'ok' on the remote, at times it is necessary to go to the top one, alter that to red then back to green, then move to the others to change those to green. ALL progs have their quirks and this is no exception!!
After this select 'ok' ON THE SCREEN then press 'ok' on the remote to accept.

View attachment 4806

***********************************************************************


Next...with emu 'camd3' (found in path 'var/keys/camd3.keys')

View attachment 4807

As above open TuxBox Commander, you will see that the opening screen is the one that you last used. To get to the required 'camd3.keys' file, highlight the two dots '..' at the left of the screen and press 'ok' on the remote. Scroll up to 'keys', highlight and press 'ok', then scroll down to 'camd3.keys', highlight and DO NOT press 'ok' but instead press number '4' on remote to enter the edit mode (same as when editing 'tpscrypt' file above).

The 'camd3.keys' file is obviously very large with so many op keys, scroll down to find, in this case, under the heading 'Viaccess', then key line '0500:007c00:0000000000:80 etc etc' (take care that it is the correct line, in this instance, for the daily 'TPS' change). Highlight the line and press ok on the remote to enter the live edit mode.With this softcam you only need to edit the 32 key line WITHOUT spaces, unlike the 'tpscrypt' file in newcamd. When complete press 'ok' then 'Exit', then select 'yes' to save. Now, if you wish, you can check the rights by pressing mumber '1' on the remote. If all are green then select 'ok' and press 'ok' on remote, press 'Exit' on remote, select 'yes' and press 'ok' on remote.

May need to restart your softcam as normal, selecting your preferred , through the blue button.

************************************************************************

Example of how to... ADD A NEW LINE to an existing file, in this case... 'constantcw'.
Recently, two lines of provider keys etc for the 2x Red Light channels at 13ºE, needed to be added to the 'constantcw' file.

Copy MANUALLY the contents/amendments that you wish to ADD to your EXISTING 'constantcw' file, ie: the new details if your Dreambox is not connected to Internet or, situated elsewhere.

Firstly with 'newcamd'

Open 'TuxBox Commander' and follow the path to the file via:

a) 'var/scce/constantcw'
:cool: Highlight 'constantcw' then press '4 Edit' with remote control
c) Green button.. 'Insert Line' command on remote- add the two SEPERATE lines for the two channels.
d) 'Exit' on the remote and 'save' as previously advised above....

The file in existence already contained the working 'cw' lines for the MTV's etc at 19ºE, so only had to use the 'Insert Line' feature.

View attachment 4808

......and finished!

Next with emu 'camd3' (although slightly different data input) but opening line and path to the file via:

a) 'var/keys/camd3.keys'
:cool:,c)and d), as above.

Main point....YES had to obtain the 'cw' file info, but editing/updating all done with no internet connection/FTP etc, is found to be very useful for those folk who do not have the Dreambox permanently connected to the PC.


Again the above is based on using Gemini 2.6 but basically same on DaVinci etc, depending on your placement of keys.

Have indicated the two commonly used softcams but MGCamd,Evocamd, Scam, Camx, F Biss, GBox, can all be handled.

If you simply want to look at the files and their contents but NOT edit, highlight the file and (referring to the menu on bottom of screen) press '3' on the remote to 'view' only....no danger at all of any editing in error!
***********************************************************************

Guide to Emu's and their respective key directories/ paths to edit files:

Newcamd: = 'var/scce/constantcw,keylist,rsakeylist,tpscrypt'
or = 'var/tuxbox/scce/constantcw,keylist,rsakeylist,tpscrypt' ....depending on Dreambox/image.

Camd3: = 'var/keys/camd3.keys'

Biss: = 'var/keys/biss_key'

Evocamd: = 'var/keys/Autoupdate.Key' and 'Keylist.txt'

MGcamd: = 'var/keys/AutoRoll.Key' and 'SoftCam.Key'

CamX: = 'var/keys/SoftCam.Key'

Scam: = 'var/keys/irdeto,nagra,seca,tps,via' etc

GBox: = 'var/keys/irdeto,nagra,seca,tps,via' etc

***********************************************************************

There are lots of other things which you will pick up with trial and error and you will certainly get to know the correct paths for the softcam files!!

LAST COMMENT - Do NOT forget to protect yourself by backing up your image before you edit, think this is good practice whatever prog/plugin you use with the Dreambox.

Hope you derive some learning and satisfaction from this great plugin.

Would appreciate constructive critisism and updates/additions on this posting for peoples easier use. - please PM remarks or open a new thread in the Dreambox section!

All said and done the Dreambox is a truly fantastic receiver.

Thank you.

;) lovelyperson


Click here for Index
 

DCG

Regular Member
Joined
May 21, 2004
Messages
117
Reaction score
2
Points
18
Age
57
My Satellite Setup
dm 7000 and 7020
cas 3
blue ice cam
sv card
redlight card
seca cam
reality cam
opos 1.03 and 1.05
lynksys router
gold cards
fun cards
1.1 mtr trix dish
0.3 sharp lnb
hh100 moter
xplus tv and inxtc card
s_x view +
ceribro card
My Location
just above the earth
extra spectial thanks to miketee
for this very in formitive post its all ready a sticky on the den and dudez thanks to cosworth4x4 and me DCG

icon1.gif
Quick and dirty guide to Dreambox
I just went through the "experience" of chosing, buying and installing a Dreambox. The results are fantastic, but it takes some courage to embark in this adventure, so here is my quick guide for the faint hearted or the Linux-impaired.

I left out some of the fancier stuff like FTPing files and so on, but with the setup below you can do everything!

If you want a much more detailed excellent how-to guide, go to h-t-t-p://w-w-w.klona.4t.com/v3.1/guide_eng/dbox-howto.htm ; if you want to keep it simple read on here.
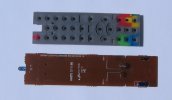
Why Dreambox 7020?
==================

First, you no longer need to play around with expensive CAM modules and smart cards and programmers. Finished.

Second, you can record TV material direct to disk. Either an internal disk (not recomended) or one on a PC connected to the Dreambox by LAN.

Third, it is fairly well built, has a good tuner, features all the things you find on a normal receiver plus a LAN connection, a USB port, a digital output, a modem port, a CF slot, a CAM slot, two smartcard slots. It does have some weaknesses, especially on the HDD and USB ports, but these can be dealt with, the other advantages outweigh these problems and there are workaround solutions.

Fourth, it is constantly evolving and benefits from the support of hundreds of bits of software and files from a large community of developers.

And many more important features described below.

Which Dreambox, 500, 7020 or 7025?
==================================

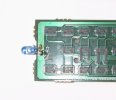
Just ask any dealer how many boxes he gets returned for repairs. With 500 and the brand new 7025, more than half the boxes have an elastic band attached ;-) OTOH, almost no problems are reported with the recent "series 3" 7020. So go for that one! The 500 price is attractive but spare yourself the grief. Start off with a disk-less 7020 box, get used to it for a while, then once you have it working in a stable way you can think of recording, but the internal disk may NOT be the best bet. Anyhow, if you do put a disk in, ONLY install Maxtor disks, all the other major brands have problems working in Dreambox. But you will do much better recording to your PC's disk, this will avoid installation of HD in the Dreambox and you can more easily transfer to DVD this way.

What is an image?
=================

An image in Dreambox lingo is firmware. Firmware is the software that gets loaded in the receiver, including an operating system, and that makes it behave the way it does, receiving TV stations and responding to your remote control.

Is the original preloaded image not good enough?
================================================

Dreambox comes preloaded with a basic Linux-based image for doing just that. So why do I need a new image? With the preloaded image you will only be able to use the Dreambox for conventional stuff like receiving FTA channels, or subscription channels using a CAM and a card, like most receivers do.

There are better images available that will allow you to do more with less, more or less, or something like that.

While there are many good images around, most people find that right now the most useful and up-to-date one is Gemini. By adding the Gemini image you can do many new things, such as downloading directly from internet all kinds of useful files, including extra features, add-ons, EMUs (emulators that behave like the plugin CAM modules) and settings files, utilities, configurators, even something called keys (you will no longer need a key to get into your house or car). Once installed, all these great Gemini features are accessible from the remote control using the blue button.

What do you need to get started?
================================

- a PC
- a good broadband internet connection using a router,
- a local area network (LAN) with an Ethernet cable to connect your router to the Dreambox, and
- a USB Stick.

USB stick
=========

You definitely need one, you could load images on the onboard flash memory, but you take a big chance doing that, and you will quickly run out of space; don't risk messing up the local flash memory, you don't want to send the box back to the shop. You also dont want to put images on a hard disk. USB stick works, it is safe. An alternative might be a CF card, procedure is almost identical.

Not all USB sticks work, the Dreambox is very picky about anything you stick into it... Check the list on the forum for compatible devices:

http://www.satellites.co.uk/satelli...-questions-tips-tricks-RTFM-2.html#post270246

Pick a USB stick with at least 128M capacity, a 64M will not allow you to correctly install Gemini image.

LAN
===

Never mind the serial cable, you will never need it, and if you use it you risk messing things up. Use the LAN, connect an Ethernet cable to your computer (using your hub/router). The recent 7020 models have DHCP, contrary to everything that is said in the manuals. This is the easiest to set up, but your address may vary every time you boot, so you need to check the assigned address to connect.

Software
========

With an "open" Linux box like Dreambox the number of available or necessary software bits is incredible, and for that reason you may spend a lot of time trying stuff only to find out there is a simpler way. After hours of fiddling, and with the help of the guys on the forum, I now have a good setup, and here is my advice.

All you need is the following software, downloadable on Toecutter or on the net:

- Gemini image, most recent version (270 at time of writing), make sure it is the version for Dreambox 7020
go to i-have-a-dreambox.com > database
- DreamboxEdit settings editor, most recent version
go to h-t-t-p://dreambox.happyllama.com/
- FlashWizard Pro programmer for Dreambox, most recent version (6.3 at time of writing, no longer requires DreamFlash)
go to _http://www.satnews.tv.it/ricevitori/dreambox/software/index.shtml#db12
- Satellite channel settings file, I use pet123 Dream Settings, go to h-t-t-p://w-w-w.rdi-***.com/uploadshow.php?id=6

Anything else, like EMUs, Cams, scripts can be downloaded through the Dreambox so don't bother downloading to PC.


Getting started
===============

So, you have taken care of the shopping list above, and you have downloaded the software. Your dish is set up properly, and you are ready to go.

Insert your USB Stick, connect the Dreambox 7020 to the antenna coax, to the LAN through Ethernet cable, and to the mains 240V ac.

Turn the box on, wait for the boot, you will be prompted to enter some basic settings like time etc.. If necessary use the remote control go to MENU and pick Setup (4 over to the left), then System Settings to adjust time.

Set up the Dreambox for your particular antenna and LNBs: from MENU pick Setup > Service Searching > Satellite Configuration, and pick your situation, you can have one satellite (one LN:cool:, two or four satellites using DISEqC switch for multi-LNB antennas, or "many satellites via DISEqC rotor"; for a motorized antenna, I do not recommend the cheap DISEqC rotors like Stab or Nokia H.H, if you want motorized go for the real thing using a polar mount, a motorized jack actuator and a DISEqC 1.2 positioner like the Aston DS-200, the entire setup will cost you under 150 Euro, not much more than a crappy H-H rotor. You can control your positioner using these setup menus.

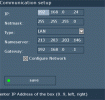
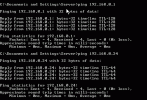
Set up IP address for Dreambox: Use the MENU button, go to Setup > Expert Setup > Communication Setup and make sure you have DHCP and LAN selected. If you make changes, reboot by going to MENU > Shutdown > Restart and wait for reboot, then go back to Communication Setup and check out the IP address, it will be something like 192.168.0.8, write it down.

Check connection to LAN: go to your PC and from your browser (cool people never use Internet Explorer and only use Firefox) enter a URL using "http://" followed by the address you wrote down in the previous step (in the example, h-t-t-p://192.168.0.8), if you have everything setu up correctly you will get a Dreambox screen showing the channel settings, you can use this to control the Dreambox, much like the remote control.

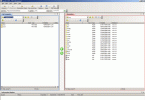
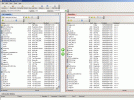
Load satellite settings: start DreamboxEdit, open the pet123 file you downloaded earlier, you will see all the channels listed on the big window on the left, and all the bouquets listed on the right hand window. The middle window shows the contents of each bouquet as you click on it on the right window. You can modify the contents, deleting channels or adding them (right click). What I do is create a few of my own custom bouquets of favourites, more or less one per satellite, and move them to the top of the list for easy access, then I drag my favourite channels from the various bouquets into my own favourites. Anyhow you can edit later, to start with just use the file as is, you can go back later and change it and reload.

Press Options, under the first Profiles tab enter the IP address of your Dreambox, then go to Advanced tab and tick "Display Reboot Dreambox option on FTP screen". Click the Save button and now press the FTP button. Press the "Send files to Dreambox" button, this puts the various files onto temporary storage in the Dreambox, then press "Reload settings on Dreambox" to get the settings activated, this takes a while so be patient, once it confirms that it is done, press "Reboot Dreambox".

Check reception: once rebooted, you should be able to use your remote control to change channels (use the UP and DOWN arrows to get the channels list page, use the blue button to pick the bouquet, then pick channel). Check reception is OK on FTA channels. You are now using the original image (firmware) of the Dreambox.

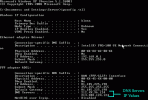
Prepare to load a new image into the Dreambox's USB Stick: Start FlashWizard Pro and go to the lower Configuration and Utilities button, under IP enter the IP address again (in the example, 192.168.0.8) and under "Device to use (Multiboot)" tick USB. Might as well check for updates with the button on the lower right.

Format and mount your USB stick: under Utilities, do a Format USB, and then Mount USB. If something goes wrong, your USB stick may not be compatible.

Install the Gemini image: Now go to "Install or remove a firmware in MULTIBOOT" using the middle button on the left. Tick "Smart settings copy from active image" so the previously loaded settings will work when you boot on Gemini, and tick "Set new image as default choice on FlashWizard Pro boot menu" so by default the Dreambox will boot Gemini. Press the folder button on the right and look for your Gemini 270 file. When you pick the Gemini file and confirm, the image will be sent to the USB key in your Dreambox, and your Dreambox will reboot.

At reboot, wait for it as it is quite slow, you will get a prompt to boot either the original DB 7020 Flashimage 2.60 or the Gemini 270 image, with the menu by default on the latter, so press OK. If you do nothing, after a certain delay the machine will boot what you set as the default image (Gemini). At first things will look just like before, except that the blue button now brings up some new important features in something called the Blue Panel.

Congratulations, you now have a very powerful satellite receiver capable of some magic things.

Enabling the magic
==================

First, load an EMU so you can avoid using CAM modules. The best one is called "camd", go to the Blue Panel (use blue button) pick Addons, go to "download and install" and pick "cam", choose the latest Camd (at time of writing, 3.838a) and confirm.

Second, load the configuration file for Camd. Go to the Blue Panel (use blue button) pick Addons, go to "download and install" and pick "cam-config", choose "Camd3 Config" and confirm.

Third, load the camd keys, these are used to replace your house keys and your car keys, as mentioned before. Keyless locks I think they call them. Go to the Blue Panel (use blue button) pick Addons, go to "download and install" and pick "keys", choose "Camd3 Keys" and confirm.

Fourth, set the automatic key updater. You may find that the locks on your front door or in your car get changed often, so in order to avoid having having the surprise of finding that your keys no longer open the door or start your car, use this feature.
To load the updater, go to the Blue Panel (use blue button) pick Addons, go to "download and install" and pick "cam-plugins", choose "AES camd3_online_updater" and confirm.
Now run the updater script, use blue button, go to System Info, User Script, pick "aes_camd3_online_updater". You must set the sleep time to 5 seconds, or the system will not have time to do the update. Use 7 seconds if necessary.

Fifth, start the cam, from the Blue Panel use the green button.

Enjoy!

Especially if you have more than one cam, you can set up the auto-cam feature, this is useful if you have many bouquets requiring different cams. Personally I use only one, but some bouquets are picky. You can set the name of the cam that will be loaded for each bouquet. From the Blue Panel press the red button, set the default cam (example, camd), this will be used unless otherwise specified by the procedures below.

If you need to assign special cams (emulators or even physical plugin CAMs) to a bouquet or even to a specific channel, go to that bouquet or channel and from the Blue Panel press the red button, pick the new cam in "Set new Cam", and assign it by pressing green button "add(pr)" to assign cam to that bouquet (Provider) or yellow button "add(ch)" to assign cam to that channel.

That's it!

Click here for Index
 

lovelyperson

Dreamer
Joined
Sep 8, 2004
Messages
1,017
Reaction score
1,819
Points
113
Location
Alicante, España
My Satellite Setup
2.0m PF dish
1.8m PF Famaval
1.8m PF Marrafa
1.4m Tecatel offset
1.2m dish + Stab HH120
TBS 5925 USB
Octagon SF8008 4k Twin
GTMedia V8 UHD
GTMedia GTcombos x 2
Goldmaster SR525 HD
Sat-illimitè F300 hyper
62.0ºE - 63.0ºW
My Location
Alicante, España
:) Ok.

Based on the DB7000 and using the image Gemini 2.80. on a USB stick.

Use the attached zipped file here,

View attachment 5887

or if you prefer, direct Freeware download for TMPGEnc 2.524 on their official web site at _http://www.tmpgenc.net/

View attachment 5888


INSTALLATION of prog/settings & photograph conversion.
a) Unzip the file to your chosen destination.
:cool: Double click the 'TPMGEnc.exe MPEG Encoder' file and click 'OK' on the small pop up window and then click 'Cancel' on the 'Project Wizard (1/5)' window that appears.
c) Next screen, bottom right...'Stream type', check the box 'ES (Video only)'.
d) Next, bottom left...'Video source:' click on 'Browse' and select the background/photo that you want as your new boot logo for the Dreambox.
e) Next, bottom left... 'Output file name:' click on browse and choose the path for your finished 'new' boot background/photo and edit the name to 'bild' (minus the '....' and in lower case) ie: the line that apperars in the 'Output file name:' should read similar to C:\Documents and Settings\DAD\Mis documentos\bild ( the actual name of the photo does NOT appear).*see attachment to clarify.
View attachment 5889

f) Next, bottom right...click on 'Setting' and check that the value settings are as the screenshot attached,
View attachment 5890

basically:

.....'Stream type:' = MPEG-1 Video
.....'Size' = 720 x576 pixels
.....'Aspect ratio:' = 1:1 (VGA)
.....'Frame rate:' = 25 fps
.....'Rate control mode:' = Constant bitrate (CBR)
.....'Bitrate:' = 12000
.....'Motion search precision:' = Normal

When checked, click 'OK' to exit the screen.

g) Top left click 'Start', if all is goes well, the '100%' bar appears and your completed 'bild' file is to be found in your chosen 'Output...' location.
View attachment 5891

CLOSE the TMPGEnc program.

***********************************************

Transferring the new 'boot' photo to the Dreambox.

ENSURE that the image that you want to change the boot/radio background pictures for, is the image RUNNING in the Dreambox when editing.


Before we start, as usual, suggest that you make a back up of the image you intend to edit so that is all goes pear shaped, you can simply reinstall the backed up image.....basic but a life saver at times!!!

With the image, that you want to change the boot photo for, running in the Dreambox, open your chosen FTP prog and transfer your new 'bild' file to the path: 'root/platform/kernel', you can overwrite or delete the pevious 'bild' file that exists.

Exit your FTP prog and reboot the Dreambox.

You should, if all ok, see your new photo on the next boot.

***********************************************

Changing the Backgroud picture for the 'Radio' screen.

1) Follow the exact steps as above with 'a)' / ':cool:' / 'c)' and 'd)'.
2) Next, bottom left... 'Output file name:' click on browse and choose the path for your finished 'new' Radio background/photo and edit the name to 'radio.mvi' (minus the '....' and in lower case) ie: the line that apperars in the 'Output file name:' should read similar to C:\Documents and Settings\DAD\Mis documentos\radio.mvi ( the actual name of the photo does NOT appear.
Note: it is 'radio.mvi' and NOT '.m1v' (this is the extension that appears by default).
*see attachment to clarify.
View attachment 5892

3) Next, bottom right...click on 'Setting' and insert exactly the same values as 'f)' above.

When checked, click 'OK' to exit the screen.

4) Top left click 'Start', if all is goes well, the '100%' bar appears and your completed 'radio.mvi' file is to be found in your chosen 'Output...' location.

CLOSE the TMPGEnc program.

***********************************************

Transferring the new 'radio' photo to the Dreambox.

As with the boot photo, suggest that you make a back up of the running image you intend to edit.

With the image, that you want to change the 'Radio' photo for, running in the Dreambox, open your chosen FTP prog and transfer your new 'radio.mvi' file to the DIFFERENT path of: 'share/tuxbox/enigma/pictures', you can overwrite or delete the pevious 'radio.mvi' file that exists.

Exit your FTP prog and reboot the Dreambox.

You should, if all ok, see your new Radio background picture after a reboot.

Hope you enjoy it.

;) lovelyperson

Click here for Index
 

mhku

Super Moderator
Staff member
Joined
Mar 8, 2005
Messages
4,712
Reaction score
20
Points
38
My Satellite Setup
TM Nano ~ sg2100
My Location
Midlands
There is no "record" button on a DB500s remote control so you can only record using the timer function. But a record button can be "added" by modifying the rcdmxxx5.xml file (and as I recently flashed my DB I lost the record button and had to remember how to do it... hence this post).

Anyway, copy the rcdmxxx5.xml file from /share/tuxbox/enigma/resources/rcdm5xxx.xml and save it to your PC.

Make a backup of it.

Use the "edit > find" facility to search for RECORD and make the following change:

change:

<action name="record" key="record" flags="m" />

to:

<action name="record" key="mute" flags="m" />


After editing it save it to /var/tuxbox/config/enigma/resources/ as the original file is read-only () and can't be chmod'd with an FTP program.

You can now use the mute button when in DVR mode (the yellow button) to as a record button on a DM500s remote.

Click here for Index
 

mhku

Super Moderator
Staff member
Joined
Mar 8, 2005
Messages
4,712
Reaction score
20
Points
38
My Satellite Setup
TM Nano ~ sg2100
My Location
Midlands
How to stream from winamp to Dreambox. Requires shoutcaster or dreamnetcast plugin on Dreambox.

I edited stations.xml used by the version of dreamnetcast attached to this:

<entry Playstring="http://10.0.0.9:9000/listen.pls">
<Name>10.0.0.9</Name>
<Genre>music</Genre>
<Nowplaying>music</Nowplaying>
<Listeners>1</Listeners>
<Bitrate>256</Bitrate>
</entry>

The key is the /listen.pls (and use your PC IP address). You may need to amend your firewall rules.

There are different versions of dreamnetcast so you have to edit yours differently (alll files required are attached, except winamp; newer versions may be available from the links given).

Thanks to rocknroll.

Click here for Index
 

T_G

The Consumate Dreamer
Staff member
Joined
Jan 1, 2000
Messages
6,693
Reaction score
241
Points
63
Age
58
My Satellite Setup
1 GigaBlue Quad plus, 1 Dreambox 5620, MOTECK SG2100A DISEqC Motor, 120 cm noname offset dish, Humax 95 cm offset dish and a few UK digiboxes.
My Location
Somewhere where the Sauer is Kraut and the Wurst is Brat
The operation is successful, the patient is alive :) (but disfigured) :eek:

My remote has been dropped on the stone floor so many times, that it stated to play up. It would only work if I twisted it when pressing on a button using both hands. Now that is unacceptable for a short term, but not for long term zapping. As I could not find any pictures or instruction I just went ahead and tried it. As I feared, when you take a plastic devise like this apart you always break off some little hooks or latches. Unless you know exactly where they are and how they work it is extremely difficult (you can see the little broken bugger in some of the pictures).

1)Taking it apart: I started from the top (i.e. near the LED). I think it is probably the best place to start as the rear part has the springs for the battery sticking through. You would need to try to push the latches (or lift the hook) so that you don't damage it. One thing to look out for: When removing the board from the lower cover, you need to get the battery springs through the hole. Be careful not to stretch them, and also take care not to rip out/damage the capacitor which is soldered onto the board.

2)The problem: The fault on my remote was that the LED soldering was loose. I scraped a bit of the clear coating off the board, and put a blob back on. I did it fairly quickly so as not to overheat anything. Quick check and it works perfectly now.

3)Putting it back together is fairly easy and straight forward. I would suggest inserting the rubber actuating knobs into the plastic cover first, then fit the board into the lower cover (with the battery springs, and click everything carfully back together.

4)Because the latch near the LED broke off, the remote is not completely closing. Also, there are some marks where I tried several screwdrivers and other methods for pying it apart. I will probably use a very small blob of glue to close the gap. All in all the hing works, so that is the most imporant. I hope that whoeve tries this on his remote will be able to do it without damage.

Keep on zapping!:-bighappy


Click here for Index
 

Attachments

  • side2.jpg
    side2.jpg
    352.4 KB · Views: 163
  • side.jpg
    side.jpg
    257.9 KB · Views: 122
  • cover.jpg
    cover.jpg
    228.2 KB · Views: 132
  • board.jpg
    board.jpg
    171.5 KB · Views: 119
  • board2.jpg
    board2.jpg
    136.5 KB · Views: 109
  • repair.jpg
    repair.jpg
    139.8 KB · Views: 142
  • board3.jpg
    board3.jpg
    238.1 KB · Views: 116

mhku

Super Moderator
Staff member
Joined
Mar 8, 2005
Messages
4,712
Reaction score
20
Points
38
My Satellite Setup
TM Nano ~ sg2100
My Location
Midlands
If you need to set up port forwarding on your router there is a good step-by-step guide for most makes of router here:

_http://www.portforward.com/english/routers/port_forwarding/routerindex.htm

Click here for Index
 

mhku

Super Moderator
Staff member
Joined
Mar 8, 2005
Messages
4,712
Reaction score
20
Points
38
My Satellite Setup
TM Nano ~ sg2100
My Location
Midlands
How to setup your Dreambox network configuration

Introduction

This is how to set up your Dreambox so that it has access to the Internet and will allow you to FTP keys to it from a Windows PC on your home network. This example uses the Gemini image so you may need to modify it to fit the menus etc. on your image. It assumes you have already set up your home network.

You have the option of using a fixed IP address or using DHCP.

To use DHCP tick the "DHCP" option and leave the IP field and netmask fields blank.


Fixed IP Addresses


For this example I will use these IP addresses:

router : 192.168.0.1
Dreambox : 192.168.0.24
PC: 192.168.0.9


The Dreambox and PC must be within the same IP range e.g. 192.168.0.n


Details

On your remote control press Menu > 6 > Expert Setup > Communication Setup

You will see a screen similar to the first attachment. Enter values for

IP = your Dreambox IP address
Netmask = 255.255.255.0
Type = LAN
Nameserver = you ISP's DNS server IP address
Gateway = your router IP address
Enable = checked


The IP address for the nameserver is the IP address of your ISP's DNS server (nameserver). To find this, on your PC click

START > run > cmd

Then type ipconfig /all to get a listing of the configuration of all your network interfaces. Note the two DNS Servers as marked in the second attachment below. Enter your value as the nameserver.

Save and reboot your Dreambox.


Does it Work?

Open a new command prompt window on your PC:

START > run > cmd

and enter

ping 192.168.0.24

You will get a reply if all is well, similar to that shown in the third attachment.

If you get a no-reply message you may need to add the Dreambox IP address to you Firewall or router as a Trusted Zone (check your documentation).


7025

Some of these options are slightly different for a 7025.

To get to the communication setup page select

Main Menu > Setup > System > Network


From there, you have two choices - Device and Nameserver Setup. There is no need to change the nameserver as the defaults work fine.

When you press "Device Setup" select the ethernet port you want to setup. Most people will only have eth0, but it still needs to be selected.

You then have an option which says "Use DHCP" with "yes" or "no" right arrow key options. Only if you select "no" will you then be offered a menu to setup your IP address, netmask and gateway. If you choose DHCP then this is set up for you (if you have a router acting as a DHCP server).

remember to substitute your IP addresses

This "how-to" is based on Klona's guide as listed in the index.


Thanks to billnot for 7025 information.

Click here for Index
 

Attachments

  • Communication_Setup.gif
    Communication_Setup.gif
    18.5 KB · Views: 926
  • ipconfig.gif
    ipconfig.gif
    9.8 KB · Views: 658
  • ping.gif
    ping.gif
    8.6 KB · Views: 530

mhku

Super Moderator
Staff member
Joined
Mar 8, 2005
Messages
4,712
Reaction score
20
Points
38
My Satellite Setup
TM Nano ~ sg2100
My Location
Midlands
Introduction

This guide will show you how to transfer keys from your PC to your Dreambox but can be used to transfer any files from one computer to another. FTP can also be used to control the permissions of those files (read write execute).

For this example I will be using Ipswitch WS-FTP Pro. The screens may differ to your FTP program but the principles are the same.

A deeper explanation of the FTP (File Transfer Protocol) is beyond the scope of this guide - please use Google if you require more information.

Details

Open your FTP program and create a new connection. Enter the details of your Dreambox:

Hostname: your Dreambox IP address
user: root
password: dreambox


set other options as required.

The first attachment shows satan keys ready to be uploaded to a Dreambox. The left pane is the PC, the right pane is the Dreambox. You will need to navigate to the correct folders using the dropdowns at the top of the page.

In this example the files on the PC are in c:\dreamboz\satan\var\keys


Upload

To upload the files from the PC to the Dreambox expand the folders until you see the files, as shown in the second attachment.

The PC pane will show

c:\dreamboz\satan\var\keys

and the Dreambox pane will show

/var/keys/

Now select the files in the left pane that you want to upload and then either drag them to the right pane or click the RIGHT arrow.

Confirm any "do you want to overwite files?" pop-ups as required.


Setting File Permissions

It is possible to use many FTP programs to set file permissions. These permissions are read, write and execute.

In WS-FTP Pro, to change a file permisison right click the file and select properties

Now tick the required permissions as shown in the third attachment. In this example the permission have been set to read write execute (755 in octal).

It is also possible to set permission using a telnet session. If you're really keen you can also open up an FTP session from the command prompt.


Optional Steps

If you have uploaded keys to your Dreambox you may need to restart the emu (e.g. in Gemini Menu > 6 > Blue Panel> start/ restart cam).

Click here for Index
 

Attachments

  • FTP1.gif
    FTP1.gif
    47 KB · Views: 650
  • FTP2.gif
    FTP2.gif
    96.6 KB · Views: 512
  • FTP3.gif
    FTP3.gif
    7.8 KB · Views: 487
Status
Not open for further replies.
Top